Definition
API or the project Programming Interface is a set of rules, guidelines, protocols and tools for building software and projects. APIs allow people to create projects that interface with the system or create new projects/UIs on top of existing systems. An API is expressed in terms of its operations, inputs, outputs, and underlying types, defining functionalities that are independent of their respective implementations. A good API makes it easier to develop a program by providing all the building blocks, which are then put together.
Configure.IT provides you the readymade blocks that makes easier to build a complete API flowchart. It allows you to build the logic visually, in the form of simple flow chart and actions, and also enables you to connect the data from different sources. Apply the correct logic along with the required parameters, method, response, etc.
View List of APIs : List
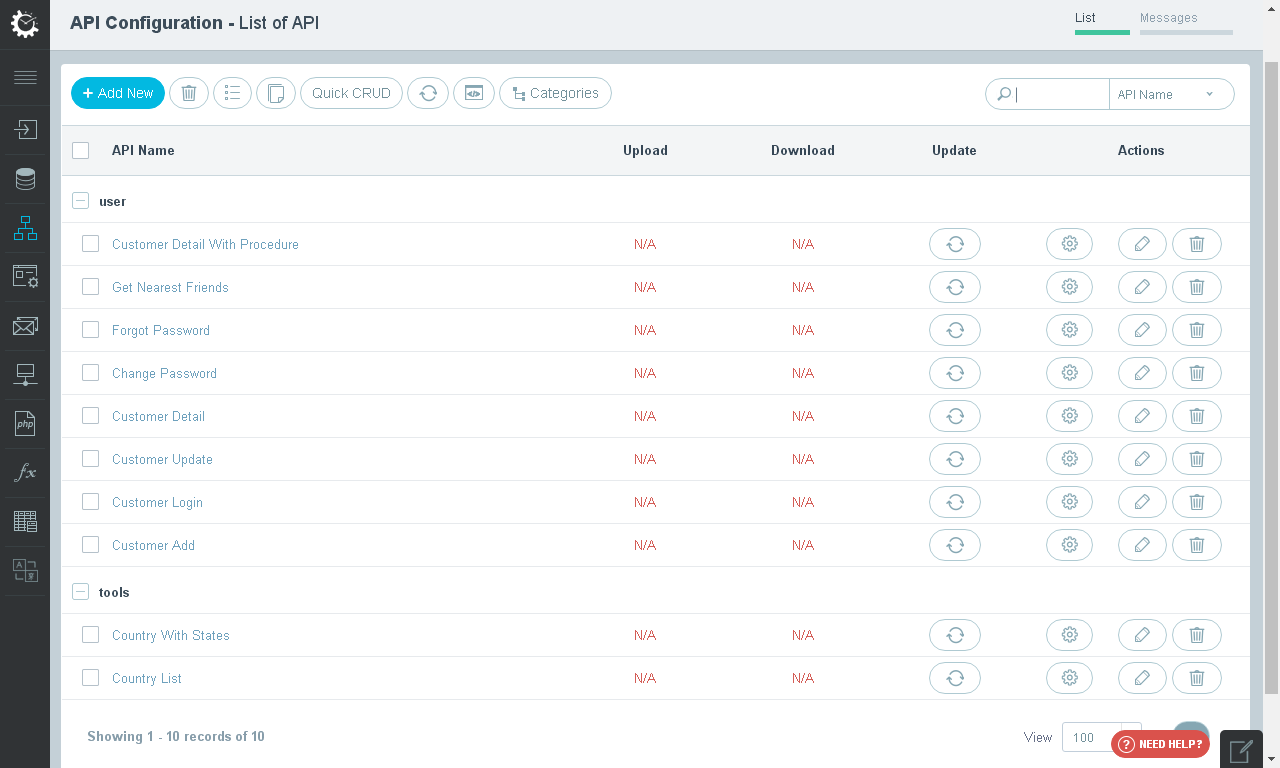
You can see default web service “admin_list” also there. First, we will take review of default screen and then move on to “Details | Configuration” part of web service.
Details of Button Bar
- +Add New : Using this option, you can add the required number of APIs.
- Delete : Lets you delete the API that you do not require anymore.
- View All : Shows you the entire list of APIs configured.
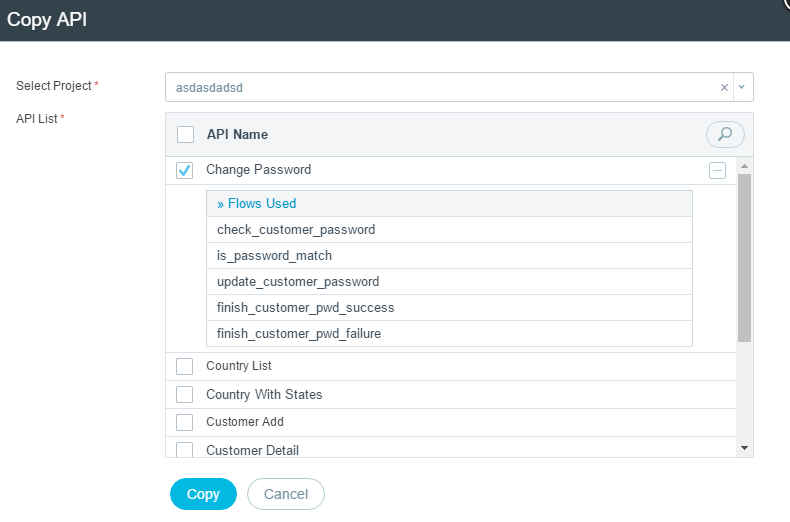
- Copy API : Allows you to copy an API / multiple APIs from same or the other projects. Select the project name and it will propagate the list of APIs available in that project. When you select any API, it will show you the details of flow which is used in specific API.
If you copy from different project, the corresponding tables also get copied along with the API.
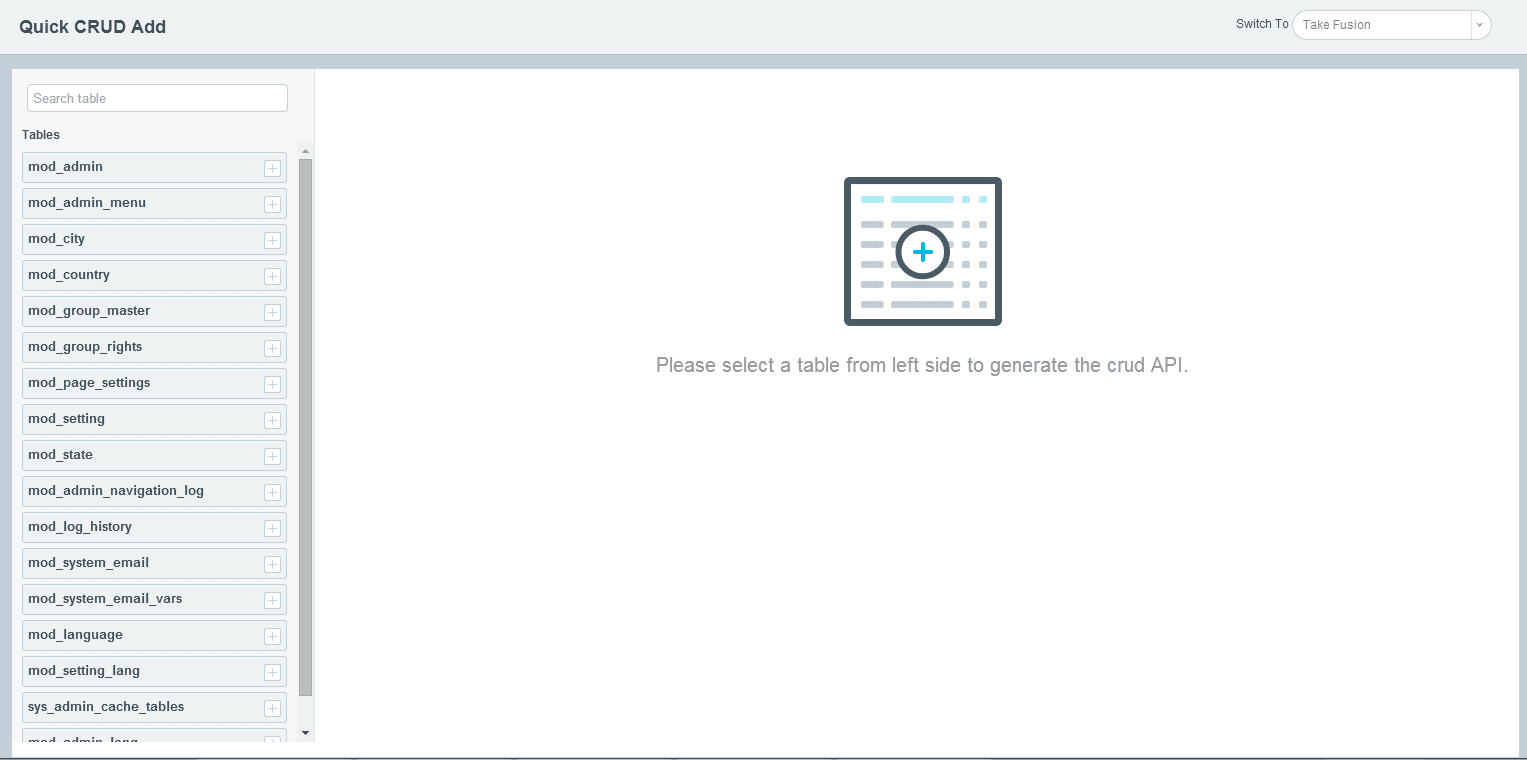
Quick CRUD
CRUD stands for Create, Read, Update and Delete. If user want to create simple API for any of the CRUD operation then there is no need to write any code for the same. Configure.IT provides on screen API generation with the help of few mouse clicks only.
This feature allows you to create 5 default CRUD APIs automatically, based on already created module settings. It allows you to set Input and Output parameters. Based on these parameter settings, it will create APIs.
The 5 Default CRUD APIs are as under - (Below given is the example taken for Tablename)
- CRUD_select_tablename : It will create Select API without Input Params.
- CRUD_sel_id_tablename : It will create Select API with Input Params.
- CRUD_insert_tablename : It will create Insert API.
- CRUD_update_tablename : It will create Update API.
- CRUD_delete_tablename : It will create Delete API.
All you need to do in above screen is, select the table and the list of modules will be propagated in dropdown as shown in below screen.
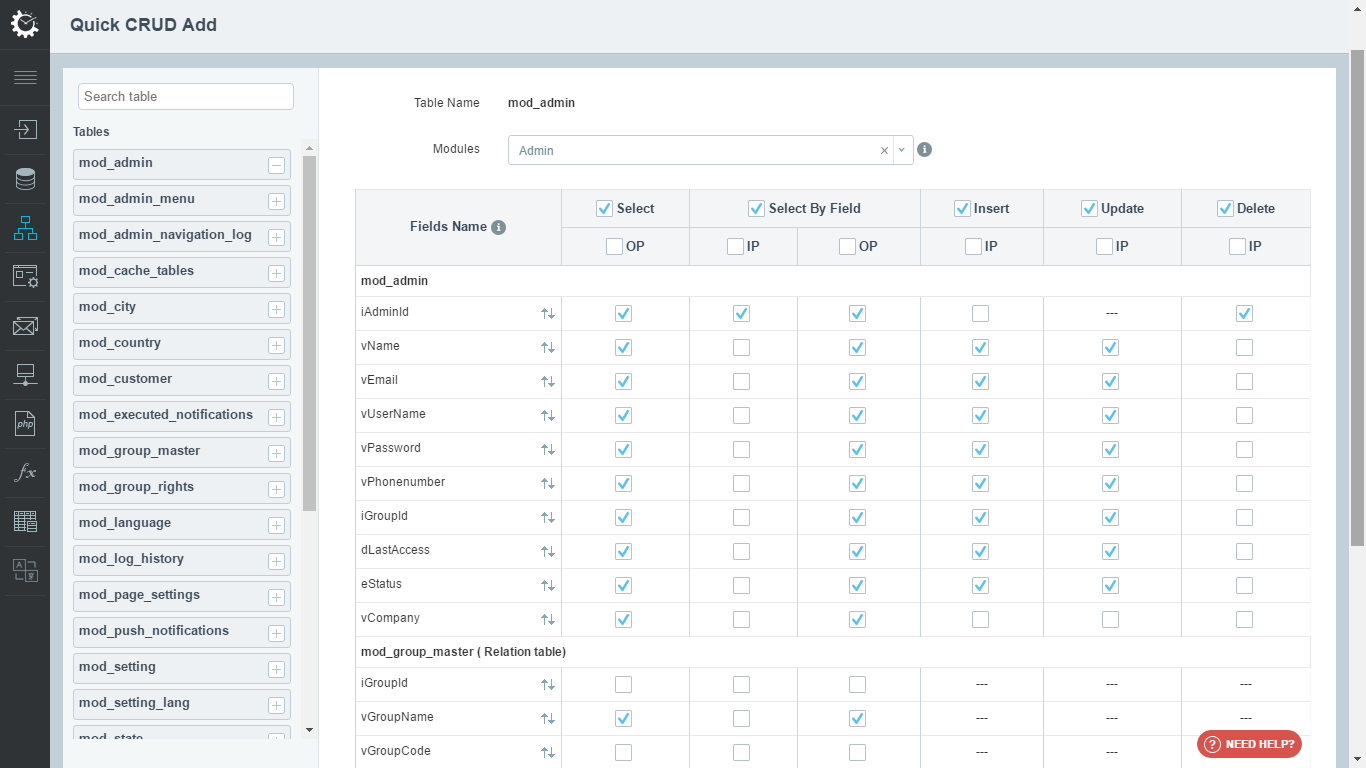
When you select the module, its related tables defined in module will be reflected here with applied configuration.
For example : As shown in above screenshot, there is a module named 'admin' with the table 'mod_admin' and 'mod_group_master' is a relational table. Fields that have been used from the table 'mod_group_master' will be selected in params.
Let's understand the CRUD screen in detail (Especially for non-technical /layman):
- Greyed Left Panel shows list of the table. You can directly select or search for the table.
- The main “Add CRUD” screen shows list of fields on left side and details of CRUD operations adjacent to it.
- Select (OP Stands for Output Parameter and IP stands for Input Parameter)
OP : fields selected/checked will be used in select condition - Select By Field
IP : fields selected/checked will be used in where condition
OP : fields selected/checked will be used in select condition - Insert
IP : fields selected/checked will be used in insert condition - Update
IP : fields selected/checked will be used in update condition - Delete
IP : fields selected/checked will be used in where condition
If you have set any field as default sorting, it will be reflected here. User can add “Order By” field to sort the data according to the requirement by clicking on icon. And that order field will be added in Order Field Name list at the bottom of the screen. Field order can be changed by drag & drop. Data order can also be altered by selecting Ascending or Descending from the dropdown.
Clicking “Generate” button, will generate the API.

If you have set any "Unique field", "Group By condition", "Validations", settings for image file and more in your "Admin" module , then it will create API based on this settings. You can even modify these settings, further.
Update Code :Update code is used to regenerate code. You can select either any number of API or you can update code of all the API(s) in one click.
Documentation :Documentation is a technical document related to code. It consists the details like how the code is generating, which controller and model are being used in the code, what is the function definition etc. For a layman, it doesn’t make much sense but for technical user, it's very useful information.
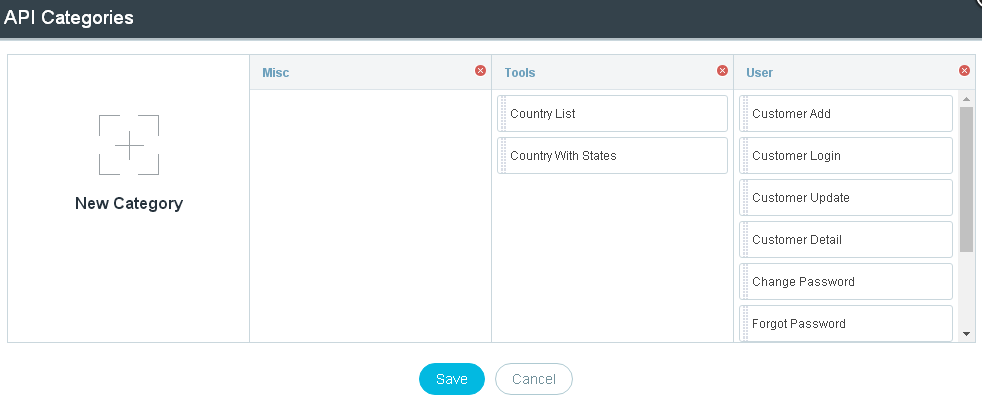
Categories :It helps you to categorize your APIs into different sections. This makes it easy for grouping or documentation purpose. Predefined APIs belong to three different default categories - Misc, Tools and User. User can shift APIs from one to another categories by drag & drop. If needed, more categories can be added by clicking on “New Category”. Don’t forget to click “Save” button to save the updated settings.

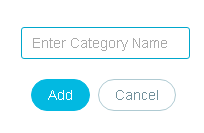
To added new category, user just need to add the name of the category and click on “Add” as shown in below screen.

Search : Searching for the API is available with two criteria as below:
- API Name
- Category
View Field List : The list of the API will display following fields. Rest of the information about an API can be viewed by clicking on API name.
- API Name : Name of the API
- Upload : To upload API on the FTP
- Download : To download each API code.
- Update : It is to update code for the latest configuration.
- Actions : Three actions can be taken as below:
- API Configurations : Configure/edit API Configuration
- Edit : Edit the API details
- Delete : Delete the API
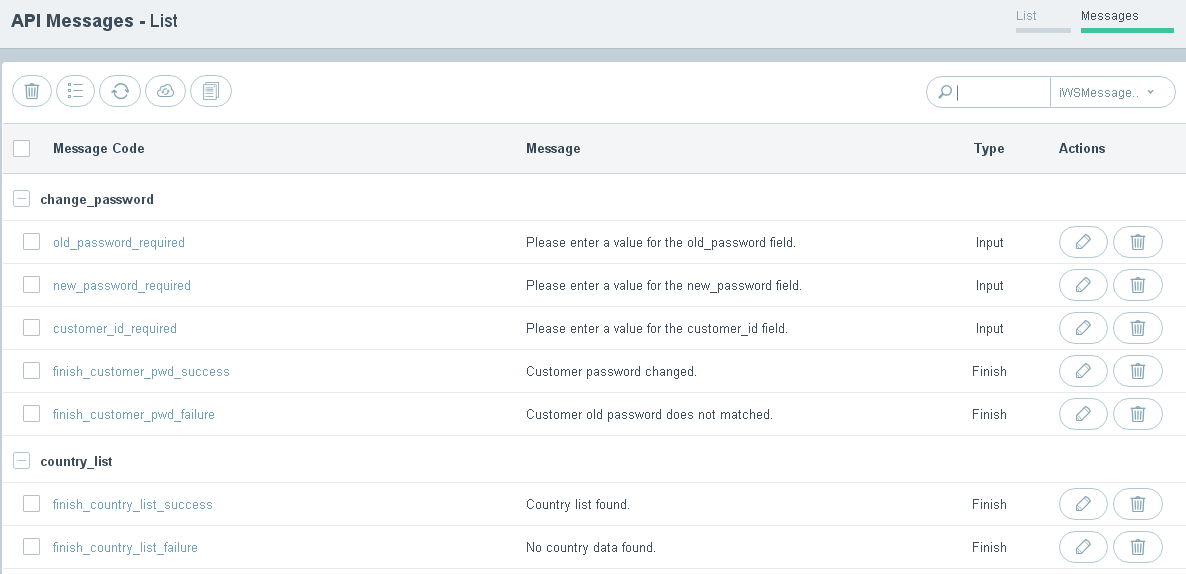
View List of APIs : Messages
Delete : will delete the selected records.
View All : can view all the records without any filtration.
Sync Messages to Admin : Yet to be released.
Translate Messages : Clicking on it will give you a popup to Choose the languages to translate API validation and finish block messages, into the languages chosen. This will begin the translation process for all API messages. The time required would depend upon number of APIs.
Download Message Files : It helps you download language files.
Search With: you can search for API messages with below listed fields.
- Message id
- Message Code
- Message
- Type
- API Name
View Field List: List of the API messages will show following fields in display. Rest of the information can be viewed by clicking on particular record.
- Message Code
- Message
- Type
Actions : below listed actions are available to take for selected API messages.
- Edit
- Delete
Add / Edit API:
API Detail
While creating any new API, you need to define some basic information for API and then move on to configuration page. Same flow is followed while editing the API too.
While editing API, you can anytime switch to other API just by selecting from the drop down list.
API Name: You can give any name of the API as per your requirement. However, API name can not start with number, it must start with Alphabets.
API Function: By this name, actual APl function in the code will be created. It will be used in API URL endpoint as well. Based on API name, API function name will be generated automatically.
Main Operations: This is informative field. It just helps to represent what is main operation of the API.
- Insert
- Update
- Delete
API Method: This field defines that how the API will accept input parameter values.
- General
- GET
- POST
- PUT
- DELETE
- Special
- GET-POST
- POST-GET
- GET(:Id)
- POST(:Id)
- PUT((:Id))
- DELETE((:Id))
API Category: It helps you to categorize your APIs into different sections. This makes it easy for grouping or documentation purpose. You can either select the category from the available list of categories or you can even Add your own category.
While assigning a category, you can also drag and drop existing APIs into different categories for easy management.
- Misc
- Tools
- User
- Add New: Clicking on this will open a window to add new category.
Description: This field informative fields which helps you write a brief narration of the API. It is used for documentation purpose.
Input Parameters : For any API, there can be zero or one or more Input parameters as per requirement. Input parameters are used to pass values which can be used for processing within API. You can configure those Input parameters in this section. For each input parameter, we have to set few fields.
- Parameter: It is a name for parameter which will be used in API.
- Type: Each parameter can contain different type of values. It can be single value, String Array or normal array, JSON array or Mobile Dictionary type array. Based on this type, it can be parsed internally within the API.
- Value
- Array (String): If parameter type is Array(String), a textbox will appear to add separator. You can specify any separator, but comma (,), Single Vertical bar (|), Three Vertical Bars (|||) are three ideal and most preferable separator.
- Array (Normal)
- Array (Normal)
- JSON (Array): You need to provide keys of JSON array. Any number of JSON keys can be added.
- Validation: If you like to validate the value for any input parameter then you can set this field. By default Configure.IT supports wide range of validations methods which you can find in the dropdown. So, before executing the API, it will validate the value of input parameter and if it is not validated then it will stop further execution of API and returns the false result.
- Message: You can set validation message from this section. For each validation, you can set your custom Message which will return as API output parameter if that particular validation fails.
- Action: Delete action can be performed using delete icon.
- Add New : This will allow to add one more parameter
Next : Click on Next and this will navigate you to the API Configuration page, saving all the changes made on the API Detail page.
Update : Clicking on this will save the changes done by user.
Update and Next : Clicking on this will save the changes in current screen and redirect user on next screen.
Cancel: Will cancel the whole process of adding new API
Edit API : Configuration
This is the screen which makes programming easy via Flowchart driven. On this screen you can configure your API business logic using different blocks and flow just like you are drawing a flowchart using visual interface.
This screen has 3 major sections: API URL, API Response and API Configuration.
API URL
Any API can be accessed via one URL. By default whenever we create an API, it will be hosted on Configure.IT demo server. This section shows that demo API URL.
It also shows all input parameters along with option to add test value so that you may execute that API and check the output.
Along with all other input parameters, it will also have the one field as ‘lang_id’, if you’ve enabled multilingual for your project.
There are 2 different action to execute the API.
- Execute: It will execute the API and shows output in a popup window or API Response section on the same page. You can directly call the same URL as well for manual testing outside Configure.IT platform as well.
- Debug: It will execute the API, shows the output along with different queries which are executed for the API. It helps you to debug the flow and queries which are being executed while processing the API.
Using the Arrow icon besides these two action, will be used to hide/unhide “API URL” section.
API Response
Each API response is wrapped in a standard structure that contains the results of the API, plus some additional useful information and metadata, such as success or failure status, message, total count of records, etc.
You can select if you want to show API response in same page or on popup. You can search any particular output key or value from search box as well.
API Configuration
Configure.IT makes developing an API is easy via creating a flowchart with set of different blocks. From this interface you can define your flow for different available blocks to configure your API business logic.
A flowchart is a type of chart that represents an algorithm, workflow or procedure, showing the steps as boxes/blocks of various kinds, and their order by connecting them with arrows. This visual representation illustrates the business flow of the API.
Configure.IT supports different block for various processing purpose like Querying to database, applying any condition or doing repetitive action in loops or sending notifications (Push, email or SMS) etc. API representation in the flow chart is the proprietary tool of Configure.IT.
BLOCKS
Flow chart consists of different blocks which are explained below in detail
Each block has a name which is used to refer that block in further processing or fetching output of that block into another block. You can also write a comment for that block for documentation purpose.
QUERY
This block is used to fire a database operation in terms of query. To configure, query block you need to set some values. For each value related setting, Configure.IT has different tabs as shown in below screenshot.
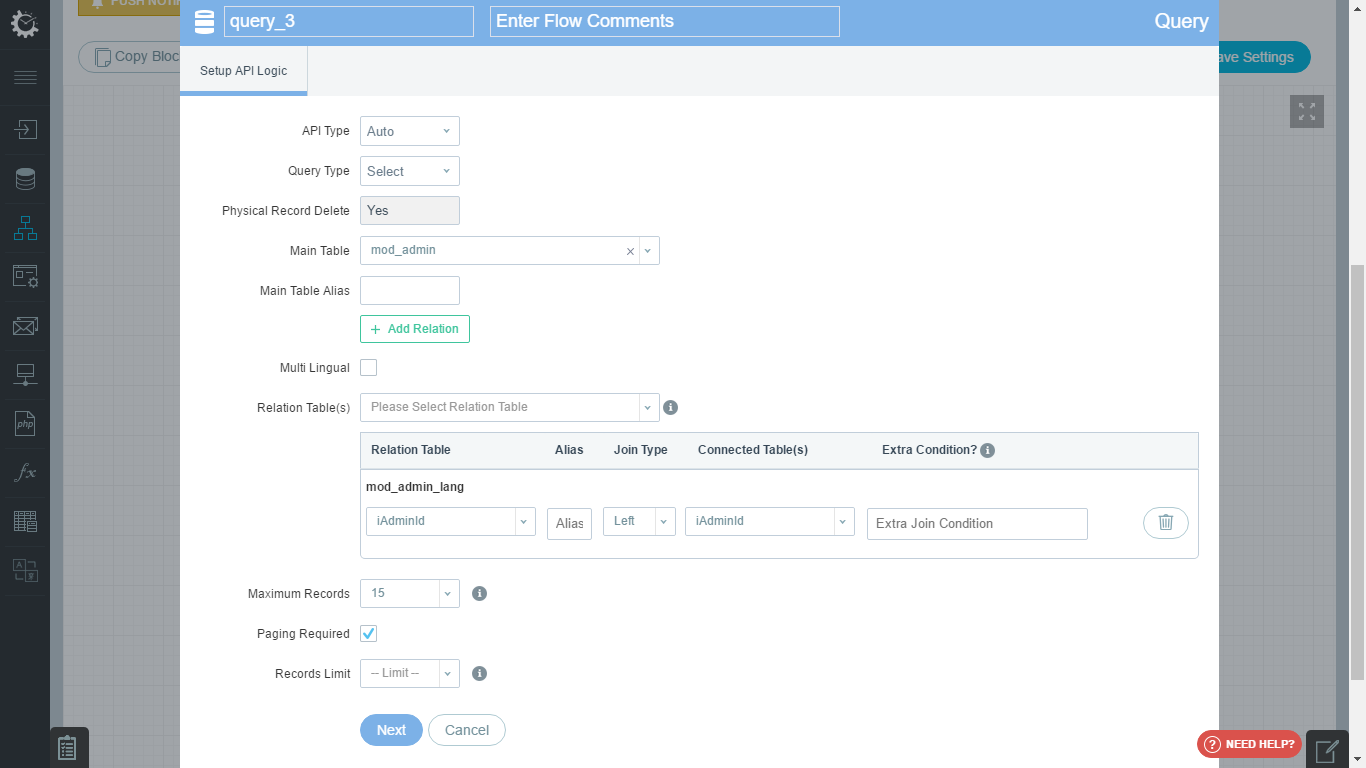
Setup API Logic
- API Type: Set value as “Custom” if you want to write your custom query else keep it as “Auto” and that will allow you to configure visually.
- Query Type: It defines the main operation of your query as either Select, Insert, Update or Delete. Depending upon this value, you can do further configuration for query. The number of fields and parameters / fields will get changed depending upon the value of this field.
- Physical Record Delete: Set value “Yes”, If you configure Delete query then it should physically delete the record from table. Else it will just change the flag of that record to “deleted”. Generally this value is auto fetched from database configuration.
- Main Table - Select the table for which you wish to perform the main operation.
- Main Table Alias - An Alias is a shorthand for a table or column name. In actual query, table will be mapped with Alias and it will be used in the query.
- Multilingual - Check if you want the API to be multilingual. This option will only be visible if the project is multilingual.
- Relation Table(s) - If Main Table is related with any other table then it will list down the tables. New relation can also be established here.
- Relation Table: Will display name of the relation table as well as drop down of the fields of the table
- Alias : You can add alias of the table too.
- Join Type: Select the type of Join you want to use for query : Left, Right or Normal.
- Connected Table(s): Will list down all the fields of both the Main and Relation Tables.
- Extra Condition?: If you want to add any single or multiple condition, or request parameter, you can write her.
- Delete: Clicking on Delete icon will allow you to delete the relation field.
- Maximum Records - If Query type is “Select” then you can define the limit of how many maximum records you want to return as output of API. General options are provided, if any specific number is required then select “Other” which will allow to enter the number in the textbox.
- Paging Required - If maximum records are more than 1 then you can define if you want to have a Paging for result or not. Check the checkbox if you want paging.
- Records Limit - Select the number of records you want to show per page.
- Result Parameter - If you execute Insert or Update or Delete query, then it returns primary ID of a record which is affected. This field defines the variable name for that ID field.
- Batch Update / Insert - If you want to perform Batch Insert or Update query then you should set this value to “Yes”. For that you need to define the Batch looping key which will be used for Batch Insert.
- Custom SQL query - If you have selected “Custom” for API type then it allows to write your custom query. You can write any kind of query in this field.
- Output Parameters - If you have used Custom SQL query then you need to define what are output parameters for that query so that it can be further used in other blocks for processing.
After configuring this block, you must have to save settings and go to next block “Select table fields” where you can select fields that you want to send in response.
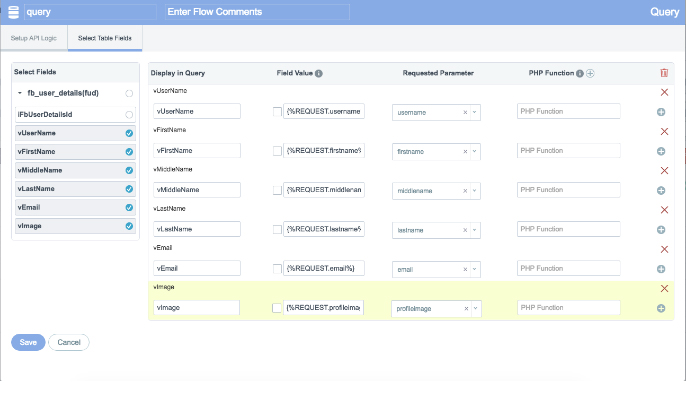
Select Table Fields (Applicable only when Query type is “Select”)
To place a query user need to select the table fields which need to be processed to provide desired result.
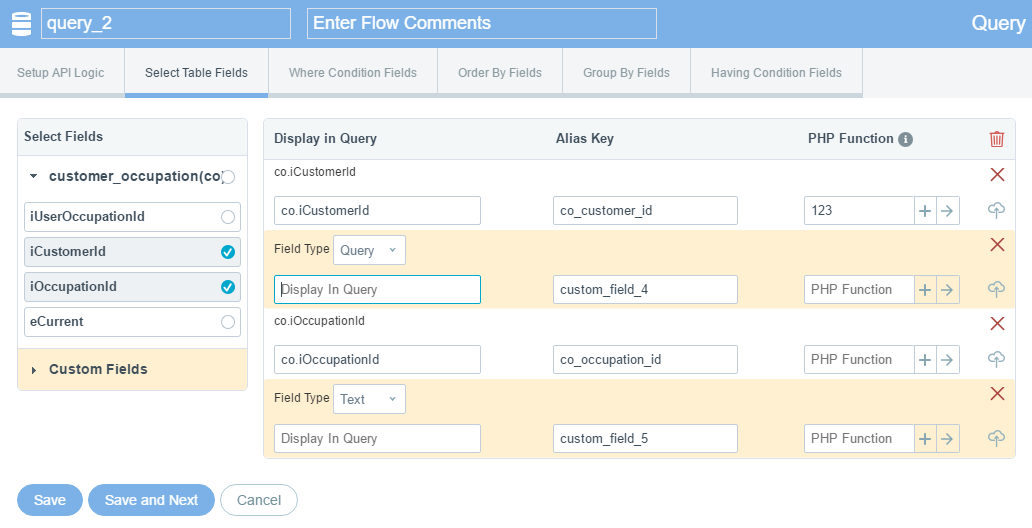
- Custom Fields
- Field Type : Select the field type as Text or Query.
- Display in Query : Custom field id
- PHP Function: Select the PHP Function
- Display in Query : By default its same as field name which user can change.
- Alias Key: If there is any alias you want to assign to field.
- PHP Function:
- Functions are autocompleted, if right name is given. It shows all possible matching functions.
- If your function is "PHP defined" function then it will perform operation on fetched data
- If your function is "System defined" function then you can see that function code in "Utiltity" => "Function List" Section
- If your function is "General defined" function then it should be declared in following path autoload > general.php file as like below
function phpFunctionName($value='',$dataArr=array()){ // do your code // return your modified "$value" } - Clicking on “+” sign, will open Function Parameters Dialog box as shown below:
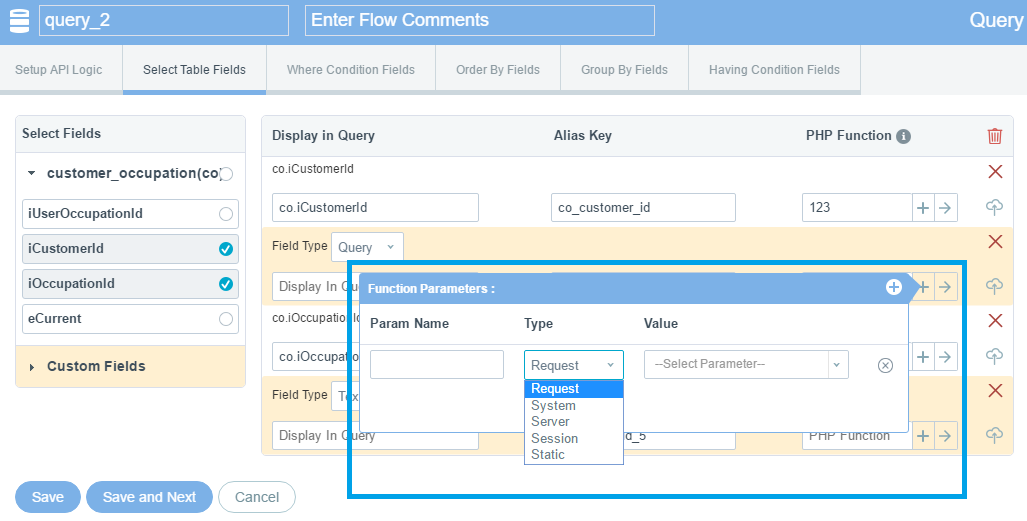
- Param Name: Write any name of the parameter name
- Type : Function parameter type can be anything from Request, System, Server, Session or Static
- Value : Will list down all the fields
- Clicking on “->” will redirect the user to “Add new PHP Function” page.
- Delete : This will delete the Field and related configuration
- Add Image Properties : Clicking on Add Image Properties will add few fields as highlighted in below screenshot.

- File Server - Select the server from the drop down as Local, Custom or Amazon.
- Folder Name - Folder will be automatically created in public > upload Eg : user_images
- Folder (ID wise) - Select the table Column Name in listing and provide "Alias Key" over here, if the images are available in individual ID wise folder. Eg : p_product_id
- Valid Extensions - Provide "comma" separated value for valid extension. Eg: jpg, jpeg, png etc.
- Width - Define the width of the Image.
- Height - Define the height of Image. Selecting/defining width and height of the image will give you the image in the pre-defined resolution.
- No Image - Want to show default “No Image” image if any other image is not there to display.
- Color Code - Color code lets you select the background color of the image.
Save settings and go to next block “where condition tables” where you can specify extra condition which is applicable for ‘where’.
Where Condition Fields : This helps you add more conditions field wise.
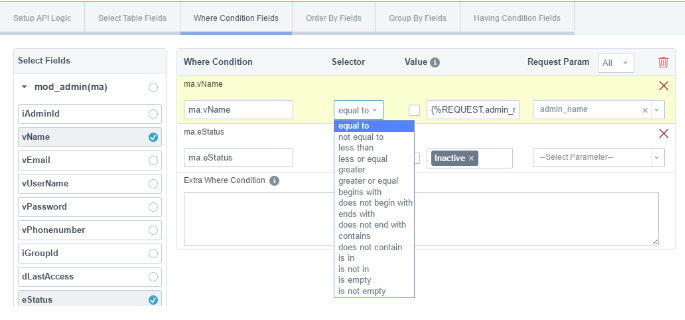
- Field Name: Selected field will be displayed as per pre-defined format. You can always change it.
- Selector - The drop down here has number of options to choose from, as, equal to, not equal to, less than, less or equal, greater, greater or equal, begins with, does not begin with, ends with, does not end with, contains, does not contain, is in, is not in, is empty and is not empty.
- Value - You can either apply custom SQL entry or you can apply given values in the textbox. According to the type of the fields, these values will get changed.
- If you want to apply custom SQL entry then check the checkbox below “Value” field. If this checkbox is checked, then you can apply given values in that textbox.
- Request Parameter - The given input parameters will be reflected here in the drop down. Find the below examples:
- Eg 1 : For SQL Function: You can use SQL functions directly like now(), currdate().
- Eg 2 : For Static Values: Static values can be applied with single quotes like 'Active' , 'Inactive'.
- Eg 3 : For Request Parameters: Requested Parameters can be used by {%REQUEST.param_name%} with single quotes like , '{%REQUEST.product_name%}', '{%REQUEST.admin_id%}'
- Eg 4 : For Server Parameters: Server Parameters can be used by {%SERVER.param_name%} with single quotes like ,
'{%SERVER.REMOTE_ADDR%}', '{%SERVER.HTTP_HOST%}' - Eg 5 : For System Parameters: System Parameters can be used by {%SYSTEM.param_name%} with single quotes like ,
'{%SYSTEM.COMPANY_NAME%}', '{%SYSTEM.COMPANY_ADDRESS%}'
- Extra Where Condition : Above explained fields attaches single value/condition, but if more where condition/s are to be added, a RichTextBox is given where user can write extra Where conditions.
Below are some real-time examples for better understanding:- Single Condition: table_name.eStatus = 'Active'
- Multiple Conditions: table_name.eStatus = 'Active' AND table_name.dRegDate >= '2012-10-10'
- Request Parameter: table_name.eStatus = '{%REQUEST.status%}'
- Server Parameter: table_name.vIP = '{%SERVER.REMOTE_ADDR%}'
- Example : REMOTE_ADDR, HTTP_HOST
- System Parameter: table_name.vName = '{%SYSTEM.COMPANY_NAME%}'
- Example : COMPANY_ADDRESS, COMPANY_NAME, COPYRIGHTED_TEXT, IMAGE_EXTENSION
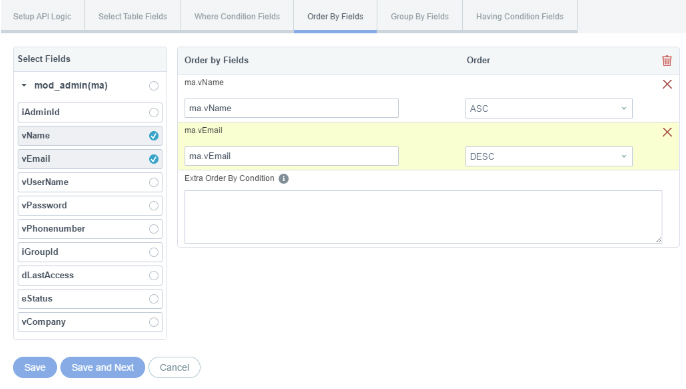
Save settings and go to next block “Order By Fields” where you can choose the fields to display the sorted output in order Ascending (ASC)/Descending (DESC). This gives convenience to view the list in desired way.
Order by Fields : Allows you to select the order type as Ascending or Descending from the drop down as shown below. You can also add Extra Order By Condition
Extra Condition examples are given below for better understanding:
Single Condition: table_name.eStatus = 'Active'Multiple Conditions: table_name.eStatus = 'Active' AND table_name.dRegDate >= '2012-10-10'
Request Parameter: table_name.eStatus = '{%REQUEST.status%}'
Server Parameter: table_name.vIP = '{%SERVER.REMOTE_ADDR%}'
Example : REMOTE_ADDR, HTTP_HOST
System Parameter: table_name.vName = '{%SYSTEM.COMPANY_NAME%}'
Example : COMPANY_ADDRESS, COMPANY_NAME, COPYRIGHTED_TEXT, IMAGE_EXTENSION
Save settings and go to next block “Group By Fields” where you can select multiple fields as Group By fields.
System Parameter: table_name.vName = '{%SYSTEM.COMPANY_NAME%}'
Example : COMPANY_ADDRESS, COMPANY_NAME, COPYRIGHTED_TEXT, IMAGE_EXTENSION
Save settings and go to next block “Group By Fields” where you can select multiple fields as Group By fields.
Group by Fields: You can even group the fields using this option. Right side will list down all the fields of the selected table. Clicking on “Add” button will add that field as Group By Field.
- Add All: This will add all the fields for Group By
- Remove All: This will remove all the fields from Group By
For group by extra condition, please provide Comma (,) separated values only.
Eg 1 : iCountryId, vCountryName
Eg 2 : iUserId, vUsername
Request Parameter: IF( 1 = '{%REQUEST.number%}', vCountryCode, vCountry)
Server Parameter: table_name.vIP = '{%SERVER.REMOTE_ADDR%}'
Example : REMOTE_ADDR, HTTP_HOST
System Parameter: table_name.vName = '{%SYSTEM.COMPANY_NAME%}'
Example : COMPANY_ADDRESS, COMPANY_NAME, COPYRIGHTED_TEXT, IMAGE_EXTENSION
Save settings and go to next block “Having Condition Tables” where you can add having condition for calculation (COUNT , SUM , AVG , MIN , MAX).
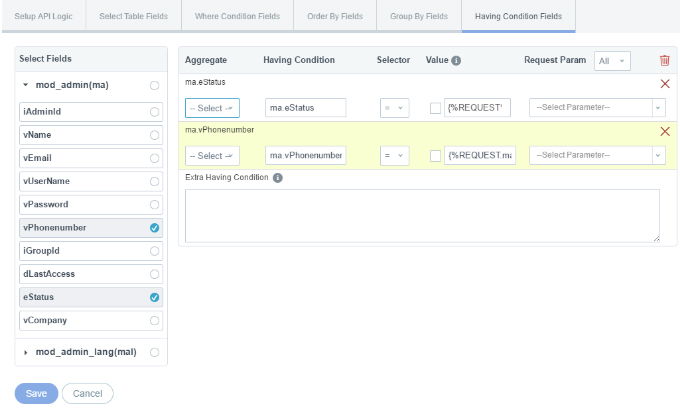
Having Condition Fields: This header is same as Where condition, except for these having conditions fields can be configured on Group only.
- Aggregate: Lists down aggregate functions like Sum, Count, Avg, Min and Max for the selected Field.
- Having Condition: Field name to assign condition
- Selector: It can be =,>,=>,=<, <, !=
- Value: You can either apply custom SQL entry or you can apply given values in the textbox. According to the type of the fields, these values will get changed. If you want to apply custom SQL entry then check the checkbox below “Value” field. If this checkbox is checked, then you can apply given values in that textbox.
- Request Param: The given input parameters will be reflected here in the drop down.
- Extra Having Condition:You can add extra Having Condition such as below examples.
Single Condition: table_name.eStatus = 'Active'
Multiple Conditions: table_name.eStatus = 'Active' AND table_name.dRegDate >= '2012-10-10'
Request Parameter: table_name.eStatus = '{%REQUEST.status%}'
Server Parameter: table_name.vIP = '{%SERVER.REMOTE_ADDR%}'
Example : REMOTE_ADDR, HTTP_HOST
System Parameter: table_name.vName = '{%SYSTEM.COMPANY_NAME%}'
Example : COMPANY_ADDRESS, COMPANY_NAME, COPYRIGHTED_TEXT, IMAGE_EXTENSION
CONDITION
This block is used to put any particular condition which decides the next flow of the API. It will have two scenarios: Success and Failure.
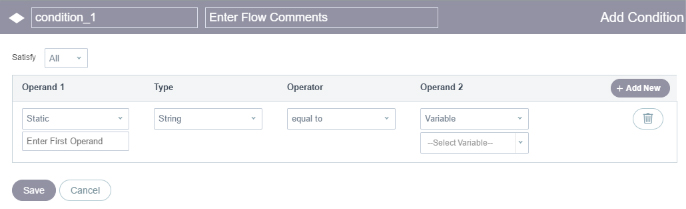
- Satisfy - All / Any One: This gives you the flexibility for the conditions to be satisfied. Choose if you wish all the conditions to be satisfied or if only one condition needs to be satisfied from all.
- Operand 1: Choose from Variable, Static or Flow.
- Variable - Select the variable from the dropdown. All the variables would reflect based on the input params selected.
- Flow: It will populate all flow labels that we have defined.
- Type - Choose the Variable type from the list in the dropdown, as, String, Integer, Float, Date, Date and Time, Time, Array and Array Count.
- Operator - Select the condition based param from the available options.
- Operand 2 - This operand can either be Variable or Static.
- +Add New - Using this option, you can add more than one condition.
- Delete - Lets you delete the condition that you do not require anymore.
- Save - Make sure to save your configuration.
- Note - Condition will be followed by Success and Failure, like (Yes / No).
- For Success - eg: finish_success
Success value would be 1. Select the params from the Param list for which you wish to give the desired output and set your success message in the given field (eg: Successfully Loaded). - For Failure - eg: finish_fail
Success value would be 0. Select the params from the Param list for which you wish to give the desired output and set your success message in the given field (eg: Error - Input the required details).
- For Success - eg: finish_success
VARIABLE
Variables blocks is used to define the type of variables to be used in the API logic as well as to assign the value to all the selected variables.
Variable types can be of two types where either user can directly assign value to the variable or can define it as array.
Assign Value: Value assignment helps replace the variable.
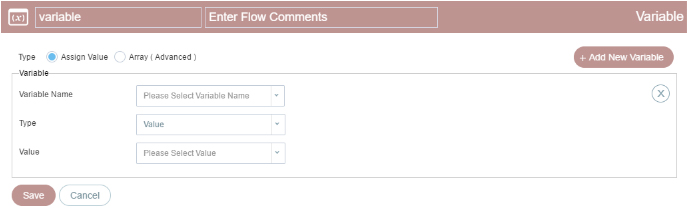
- Variable Name - Enter the variable name that you wish to be replaced by.
- Type - Select the type from the available options as, Array (String Separated), Array (Single Dimensional), Array (Multi Dimensional)
- Value - Enter the value with that will replace the variable name.
- +Add New Variable - Add another variable required.
Array (Advanced) - This allows to change from value to Array.
- Key - Key should be Alpha Numeric Value with underscore in lowercase.
Value - 1) Other - Value: This can be Input Parameter, Other, Expression or Function. All these options are explained below with examples
- Other: Enter Alpha Numeric Value with underscore in lowercase.
- Expression
Eg 1 : 1 + 2
Eg 2 : {%REQUEST.qty%} * 2
Eg 3 : {%SYSTEM.price%} - Function: Function should be declared in
project
> libraries
> general.php
file as like below
function functionName($input_params='',$index_val= ''){
// do your code
Return value must be value or array.
}
- Action - Lets you delete the Variable
- +Add New - Lets you add new variable for the Array type.
- Save - Save the configuration changes.
- Cancel - Cancel will not save any changes.
BEGIN LOOP
A loop is a sequence of instructions that is continually repeated until a certain condition is reached. Loops are used to repeat a specific block until some end condition is met.
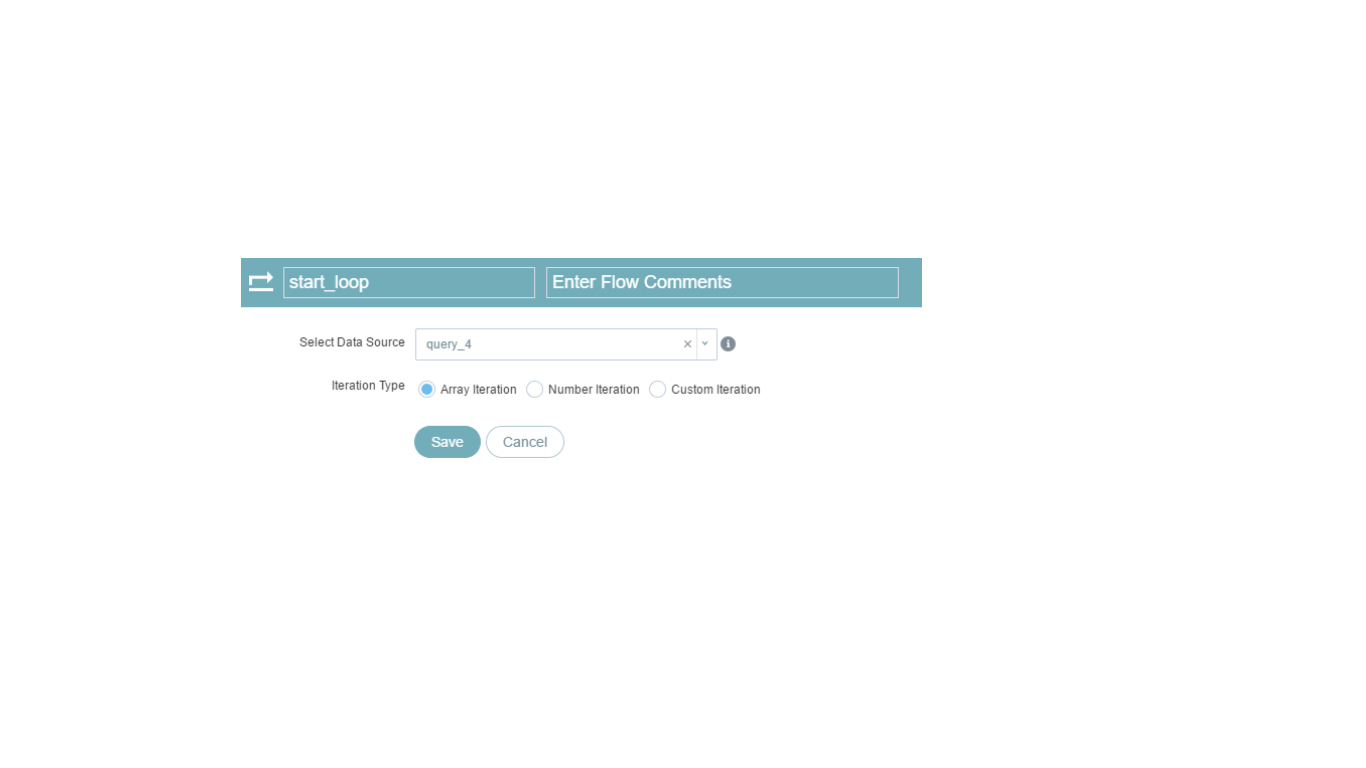
- Select Data Source - Select the Datasource from the dropdown. Here Datasource refers to the API Flows. You must specify "Flow Label" of any of the flows as Loop Name.
NOTE : Please do not specify the current or below flow label as Loop Name. - Iteration Type - There can be different types of iterations to choose from depending upon the requirement.
- Array Iteration - This specifies how many times a loop will iterate. It depends on the data source you select.
- Number Iteration - Loop will iterate the number of times specified by user.
- Iteration Loop Times: Specify the number of times the loop would iterate.
- Custom Iteration : Special requirements can be satisfied by customizing the iteration.
- Start Point - Define the static value as number or the variable name, to begin with.
- Operator - Set the value for the looping variable from the available options.
- End Point - Define the static value as number or the variable name, to end on.
- Counter - By default, the counter is 1 but if user wants to give customized counter e.g. alternate records then it can be specified from here.
END LOOP
It allows you to end started loop. You just need to select started loop that you want to end.
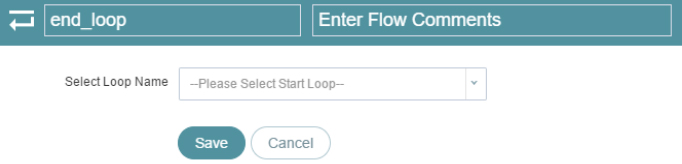
You can always have break the loop, if required by using “Break/Continue”.
BREAK/CONTINUE

- Type: It states the type of task to be carried
- Break - This will let you break the looping and its execution and will continue with the API flow.
- Continue - By selecting continue, this will continue the looping and start with the next iteration.
- Satisfy - All / Any One
- Operand 1 - Variable
- Static - Lets you define the static value in the given below textfield.
- Flow - Allows you to select the blocks as defined in the flowchart.
Selecting the flow will give you the value for Operand 2 as Success / Failure.
- Type - Choose the Variable type from the list in the dropdown, as, String, Integer, Float, Date, Date and Time, Time, Array and Array Count.
- Operator - Select the operating condition from the available list.
- Operand 2:
- Variable - Select the variable based on the input params and the query blocks, as in the flowchart.
- Static - You can even give the static value.
- +Add New - You can add more operating conditions here.
- Delete - Delete the condition not required.
CUSTOM FUNCTION

- Function Type: There can be two types of Functions.
- General Function: Add your custom function in PHP and call the same function here. Even a new function can be added runtimne from the same screen too by clicking on “+”.
- Existing API: Existing API can also be used directly by providing return type and response type. You just need to provide API name and it will manipulate all the input and output parameters below it.
- API Name - Select the required API from the dropdown.
- Current Input params - Input params entered earlier, will reflect here.
- Output params - Map the output params with the Input params.
- Return Type - Select the return type, based on your requirement.
- Multiple - This will allow you to connect more than one API, internally.
- Single - It will connect and call only one API.
- Response Type - Select the custom response type, based on given options. This will be visible only when the Return Type is Single.
- Add - Selecting add type, will return the output params.
- Replace - Existing data will be replaced by output params.
- Overwrite Flow - Select the flow which you would want to be bypassed.
- Merge - Existing data can be merged with the output params.
- Function Name - Function should be declared in
project > libraries > general.php file, as under -
function customFunctionName($input_params=''){
// do your code
If you are providing output parameters then provide return array like below:
(i) If single output parameter:
$return_arr[0]['user_id'] = 1;
$return_arr[0]['email'] = "[email protected]";
$return_arr[0]['name'] = "John";
(ii) If multiple output parameter:
$return_arr[0]['user_id'] = 1;
$return_arr[0]['email'] = "[email protected]";
$return_arr[0]['name'] = "John";
$return_arr[1]['user_id'] = 2;
$return_arr[1]['email'] = "[email protected]";
$return_arr[1]['name'] = "Janni"; - Output Parameters - Add the output params, which you would like to have in the form of response. /ol>
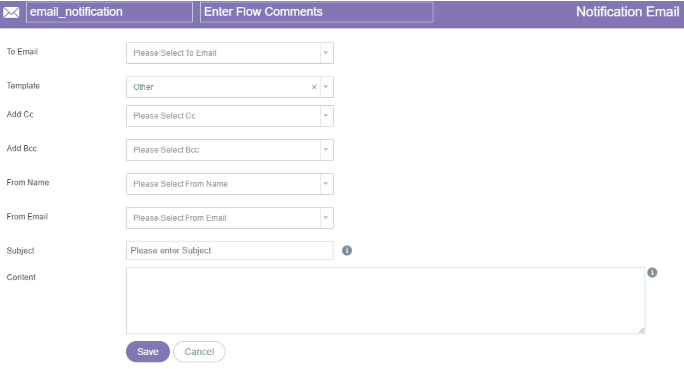
- To Email - Select the Input param, based on your requirement and the fields.
- Template - Select from the pre-defined templates. You can also add your own template via other field and type in your message in the content field. Alternatively select the function from the dropdown and select the function name from the available list.
- Add CC - Enter the recipient name to whom you would like to send the copy of a message.
- Add BCC - Enter recipients whose addresses you want to hide from other recipients in the BCC field.
- From Name - Enter the sender name from whom the email will be sent.
- From Email - Add the email id from which the email is to be sent.
- Subject - Add the subject of the Email.
- Content - Add the main content of the Email to be sent.
- Save - This will save the email configuration settings.
- Cancel - will cancel the whole process of Email notification configuration.
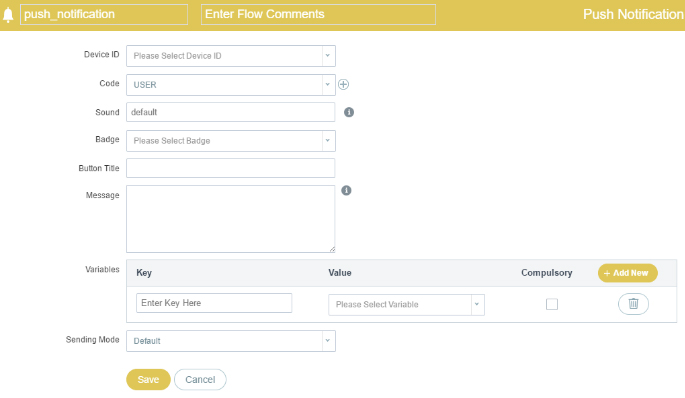
- Device ID - Select the Device ID from the dropdown.
- Code - USER / ALERT: This is used for internal purpose. If code = USER then operation1 will take place and if code = ALERT then operation2 will take place. Like this only, we can add more codes also for more conditions. This is project requirement specific.
- Sound - Select the sound of the Notification from; Default, Alarm, Received and Received1. It’s a kind of ring tone / sound which user will hear when the notification will be received.
- Badge - Badges appear on your profile page, flair, and your posts. You receive badges for being especially helpful. Select the badge location from the dropdown.
- Button Title - Give the title name to your button.
Message - Response parameters should be precede and followed by "#" symbol.
Example:- #variable_name#
You can use request, server, system parameters also. :-
Request Parameter: table_name.eStatus = '{%REQUEST.status%}'
Server Parameter: table_name.vIP = '{%SERVER.REMOTE_ADDR%}'
Example : REMOTE_ADDR, HTTP_HOST
System Parameter: table_name.vName = '{%SYSTEM.COMPANY_NAME%}'
Example : COMPANY_ADDRESS, COMPANY_NAME, COPYRIGHTED_TEXT, IMAGE_EXTENSION - Variables
- Key : Enter the key value
- Value : Select the value from the list
- Compulsory : Select if its compulsory or else leave it blank
- Sending Mode - When to send the push notification can be selected from 3 options:
- Default: This setting is in Project level setting in Admin Management. In In Email Settings, "Push Notifications Send Type" is the a setting where you need to select either cron or run-time.
- Add to Cron : when next time the cron-job will be executed so this will add in the queue for Cron.
- Run-time : This will notify the user immediately.
- Phone No: - This is the field wherein you can enter the contact number of the recipient.
- Content - You can write the content of SMS in this field.
- Param List - Select the required parameters from the list.
- Status Code - Select the status code from the dropdown.
- Success - Enter the success parameter here.
- Message - Enter the Success message which you would wish to be reflected when the condition is successful / satisfied. If the project is multilingual, you need to enter message for all the languages.
- Pause flow execution - You can pause the execution of the API flow.
- Step over next flow - The currently-selected flow is executed and suspends on the next executable flow.
- Deactivate breakpoints - Breakpoints will always break the execution logic. Deactivate the breakpoints will deactivate the breakpoints so the execution logic will continue without breaking.
- Click to Lock - Lock your API flowchart. This will prevent user from accidentally making the changes / deletion.

- Copy Block - This lets you copy an API block from another project of yours. It will have all the related configuration as well. Select the project name from the dropdown and select the required API block. Lastly, click on Copy. This will copy the same API in your API. This saves a lot of time of doing repeated work.

- Capture - Click on it and you will have the snapshot of your API flowchart, in the form of image. This helps when you may need to make revert back to the configuration if you have tried with many options. It will download the configuration image to downloads folder of your computer.

- Valid/Invalid - If there's any error in the configuration of API, Invalid will reflect. Click on it and you will get to know what you’re missing. It will show the list of missing flow from each block. Else, it would reflect as Valid.

- Save Settings - Make sure to save the changes you’ve made. Save settings will take care of all the modifications you have made in the API. It will show API flow errors, if any, while saving.
API CONNECTOR
Please refer to http://www.configure.it/help/api-connector.html for detailed information
During API Configuration process, if you want to notify the user through Email, then Email Notification can be configured as shown in below screen.
Here are some guidelines for better implementation:
Response parameters should be precede and followed by "#" symbol.
Example:- #variable_name#
You can use request, server, system parameters also. :-
Request Parameter: table_name.eStatus = '{%REQUEST.status%}'
Server Parameter: table_name.vIP = '{%SERVER.REMOTE_ADDR%}'
Example : REMOTE_ADDR, HTTP_HOST
System Parameter: table_name.vName = '{%SYSTEM.COMPANY_NAME%}'
Example : COMPANY_ADDRESS, COMPANY_NAME, COPYRIGHTED_TEXT, IMAGE_EXTENSION
PUSH NOTIFICATION
A push notification is a message that pops up on a mobile device. Push notifications let your project notify a user of new messages or events even when the user is not actively using the project.
Generally on Android devices, when a device receives a push notification, your project's icon and a message appear in the status bar.
SMS
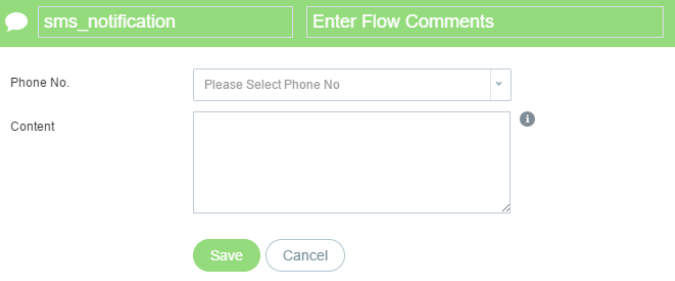
SMS or Short Message Service is a text messaging service component.
FINISH
Last would be the Finish block. This will help you end the flow of an API. You have to use finish block for setting “Success / Failure” message. This will also help you end the flow if the condition is “true (1) / false (0)”.

Quick Access Keys:

SQLite
+Add New
Active
Inactive
View All
Copy API - Clicking on this option, a popup will appear with the list of Projects and APIs. Select the desired project and the related API and this will copy the API.
Sync API
Copy from MySQL - Using this option, with a click you can copy your existing MySQL API to SQLite API.